

Access your Applied Energistics 2 networks from a desktop or mobile browser. Browse storage and crafting CPUs live, request crafts, explore resource history and build a personal dashboard with pinned resources. Public servers can give each player their own account and access to their networks.
Works on dedicated servers and in single-player worlds. Multiplayer clients do not need the mod.
It adds no items or blocks.
The optional Icon Generator client-side mod (ae2webintegration-icon-generator-*.jar)
generates item icons from your modpack and resource packs.
🌐 Official website ·
📖 Installation guide · 🔧 API documentation
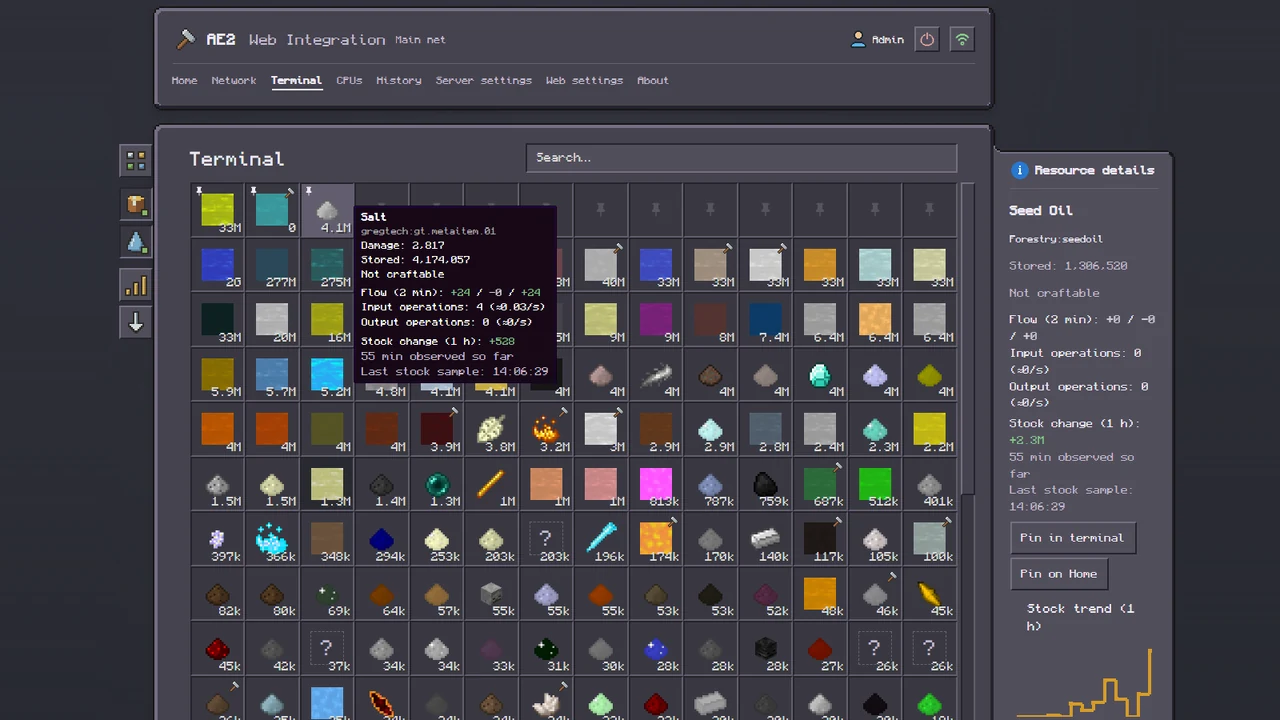
- Browse, sort and filter multiple AE2 networks, with live storage and selected-CPU updates
- Submit crafting requests with automatic or manual CPU selection, and cancel running jobs
- View completed and cancelled crafting jobs after a server restart
- Track resource stock, input and output with interactive history charts
- Use responsive desktop and mobile layouts, light/dark/system appearance, and Monocraft or Lato fonts
- Choose names, icons or both, with configurable columns and page sizes, including no pagination
- Receive crafting notifications through Discord or ntfy when public mode is disabled
Pin a resource from its context menu or Resource details. Pin in terminal keeps it at the top of that network's terminal, above search and filters. Pin on Home adds a dashboard card with configurable charts and summaries, visible regardless of the currently selected network.
Pins belong to your web account. Each player can keep their own terminal pins and Home layout; Home can show resources from several networks together. Pinned resources retain access to recorded history when they are no longer present in storage.
After calculating a plan, choose Export at the bottom left of the plan in the default theme (the image icon on mobile). Choose PNG or SVG, the grid layout, tile contents, ordering and background. The export includes the full plan independently of the current search and works without an icon pack. The tree view also offers both formats and exports its currently expanded branches. Use Focus missing to expand shortage paths and fold healthy branches. Affected recipes keep all their immediate ingredients visible. SVG files include their icons and font and stay sharp when zoomed; very large PNG images use a lower resolution to fit. Export settings are remembered for the next export.
The mod currently supports Minecraft 1.21.1 (NeoForge), 1.20.1 (Forge), 1.12.2 (Forge), and 1.7.10 (Forge/GTNH). Builds for different versions are not interchangeable.
A few additional compatibility notes:
- The 1.7.10 build targets the GTNH forks of AE2 and AE2FC.
- The 1.12.2 build targets AE2 UEL and AE2FC for 1.12.2.
- The 1.20.1 and 1.21.1 builds include optional AdvancedAE integration.
- A compatible AE2 installation for one of the supported Minecraft versions
- A loaded ME network with a valid ME Controller
- An available TCP port for the built-in web server
- A firewall/NAT rule if you want to reach the panel from outside your local network
By default, the panel is available at http://your-server-ip-or-domain:2324/. The port is configurable.
Crafting, resource history, mobile view and notifications
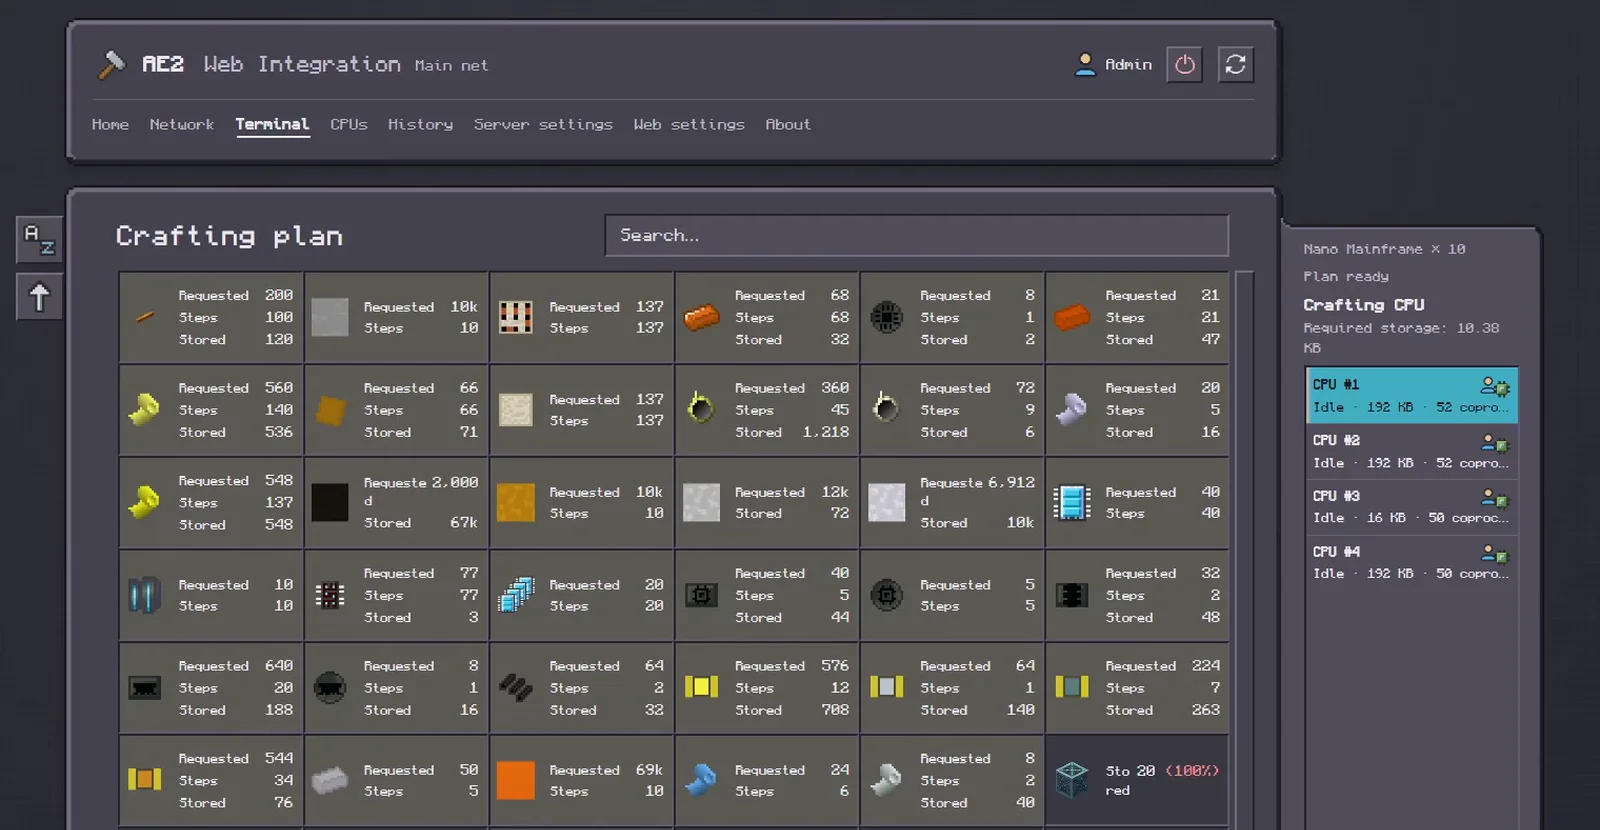
Crafting plan and CPU selection
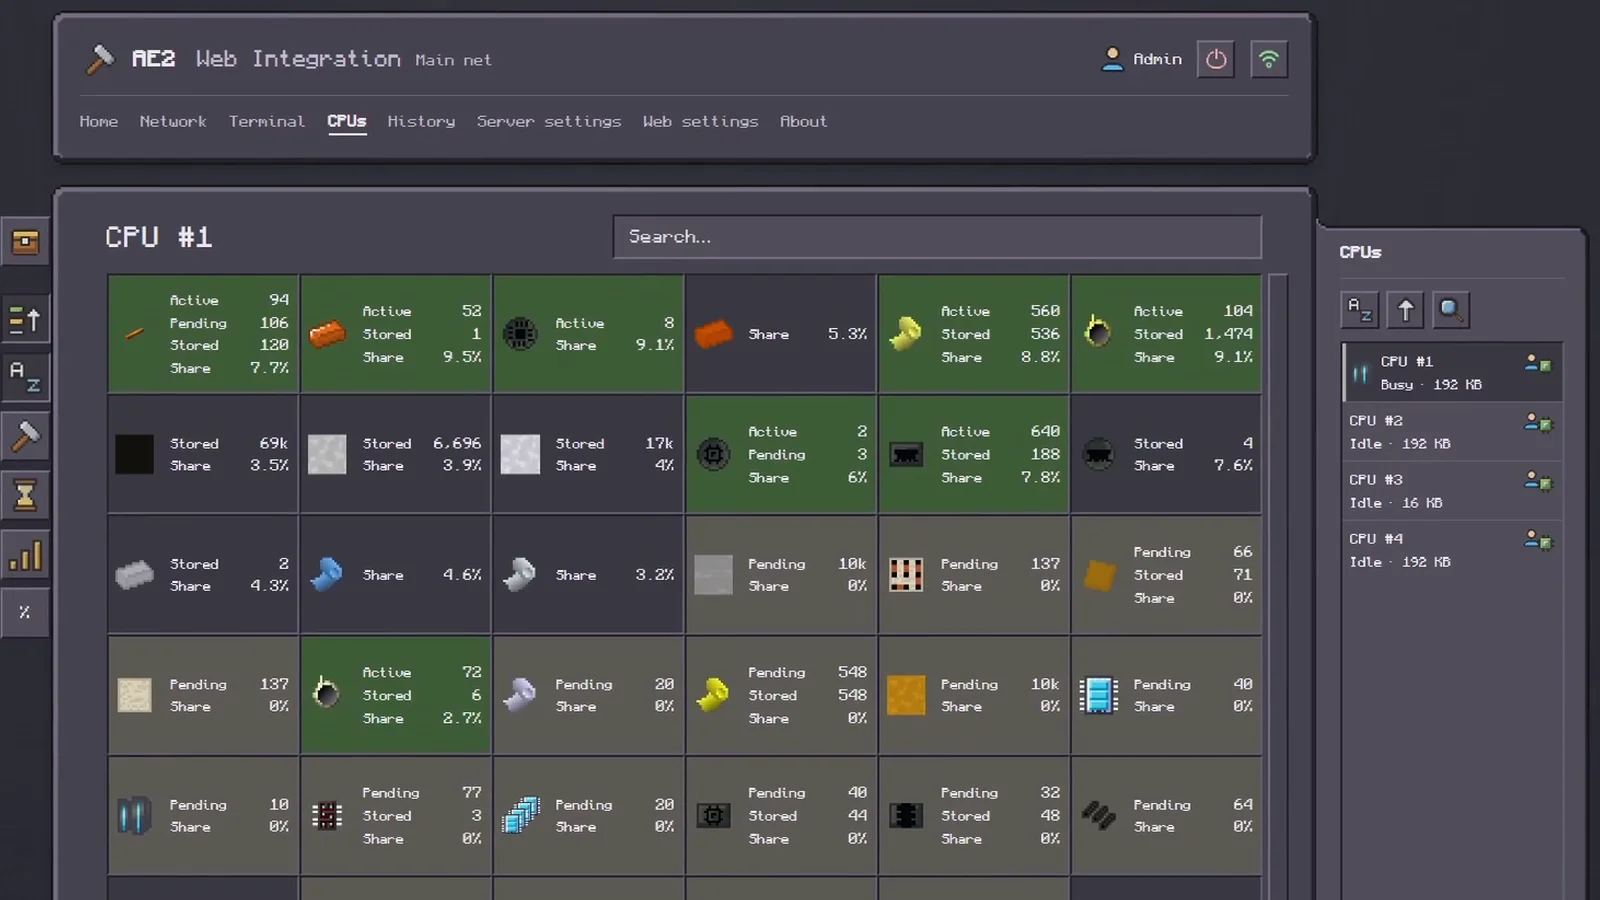
Live CPU view
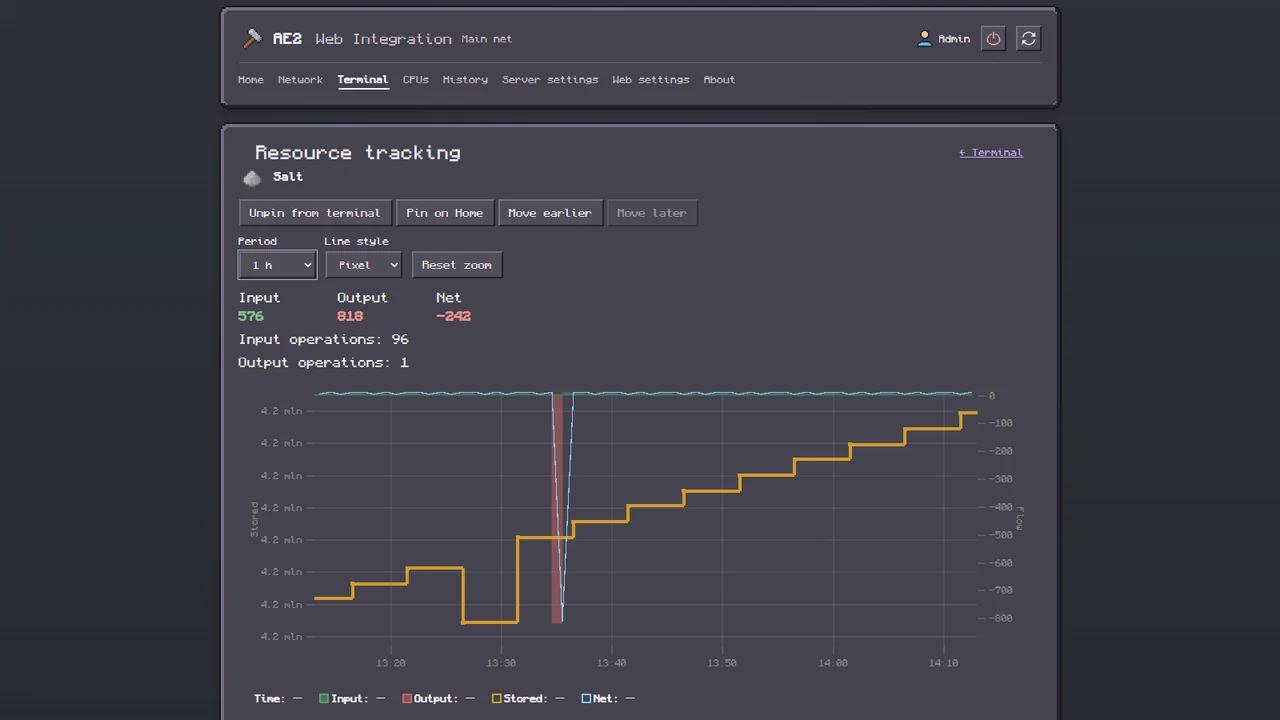
Resource history
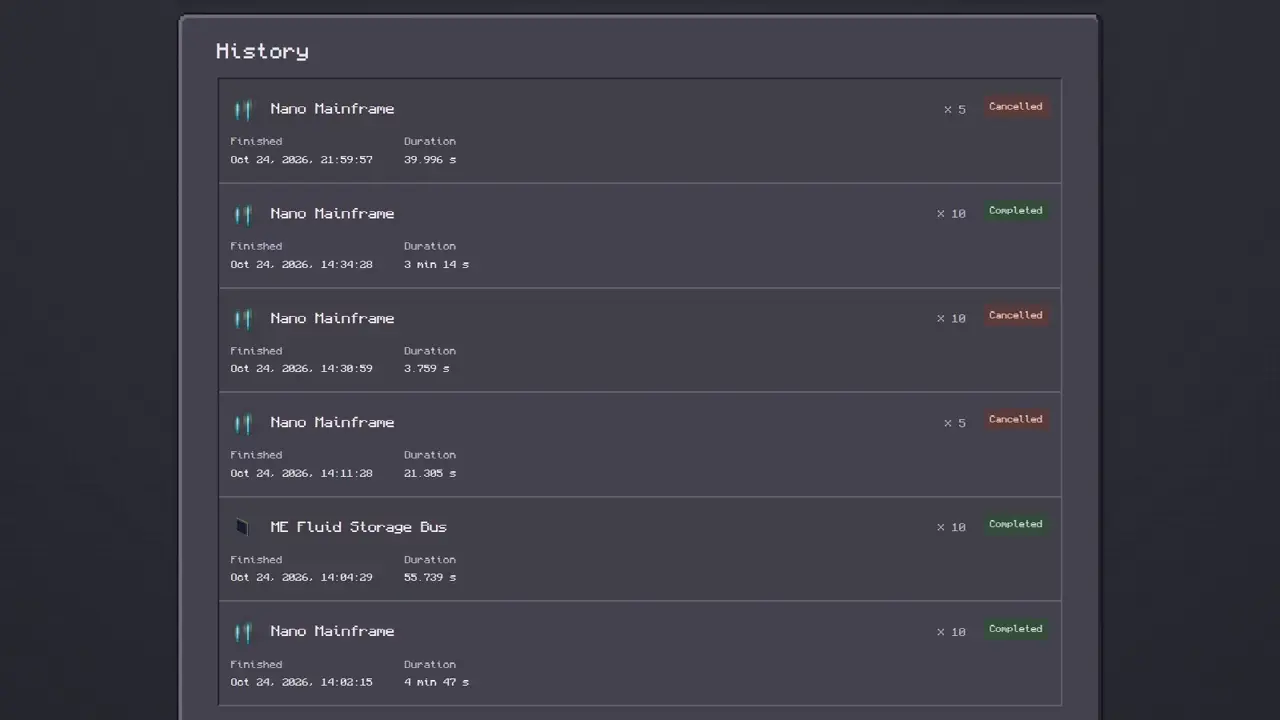
Completed and cancelled crafts
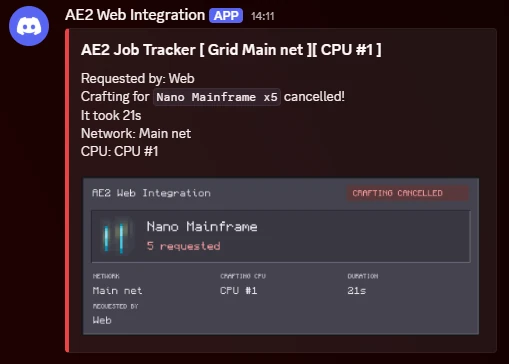
Discord notification
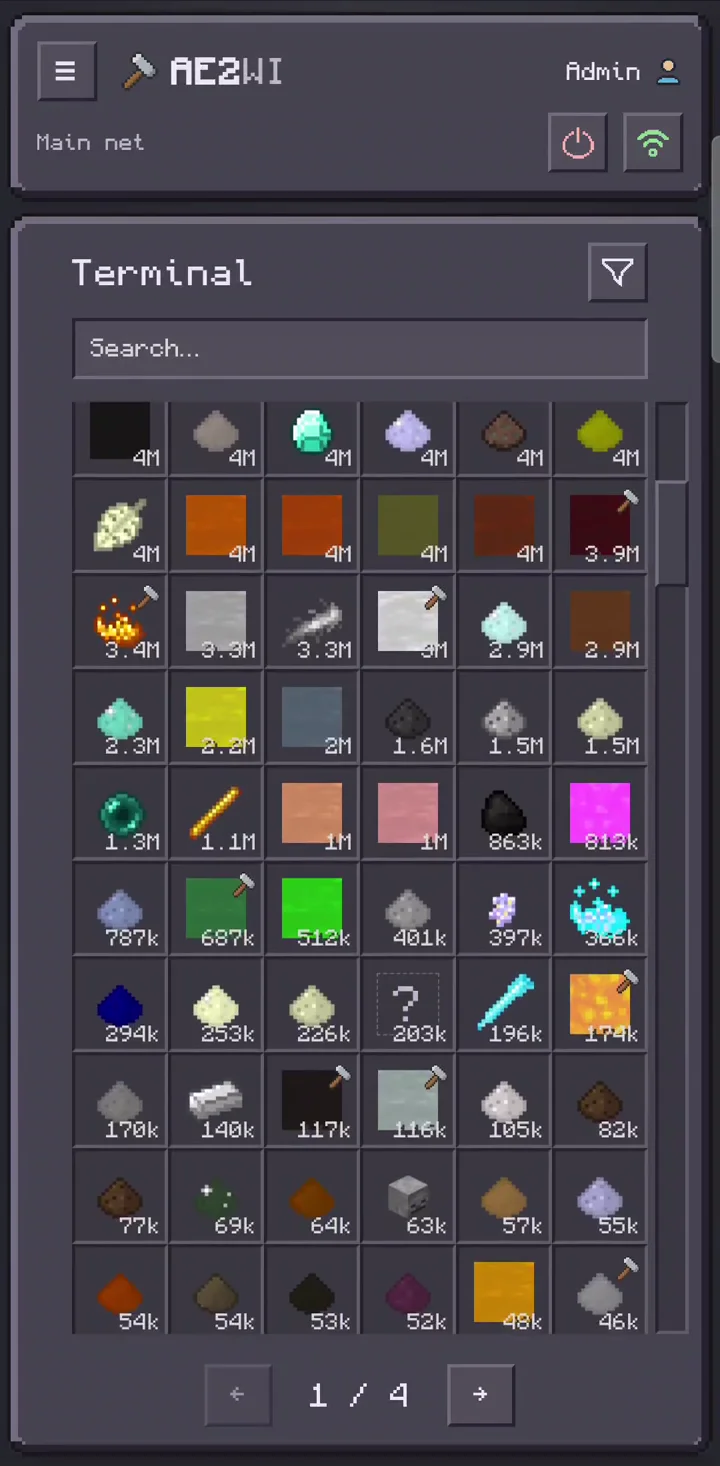
Mobile terminal
Earlier video showcases
These videos show an earlier interface. See the gallery and demo above for the current UI.
The mod hosts its web panel and API on an HTTP server that starts with your Minecraft server or single-player world.
- Download the main mod JAR for your Minecraft version and mod loader from this project's downloads.
The separate file with
icon-generatorin its name is the optional client-side icon generator. - Drop the mod into the server's
modsfolder, or your Minecraft instance'smodsfolder for single-player. In multiplayer, only the server needs the mod. - Start the server or open a single-player world once to generate the config.
- Open
config/ae2webintegration/config.toml. Configure the port, admin password, public mode, and other settings as needed. - For single-player or a private server where everyone shares the Admin account, disable public mode. Keep it enabled if players need separate accounts and access to their own networks.
- Reload the config with
/ae2webintegration reload, or restart the server or single-player world. - Allow the configured port through your firewall and router as needed, or route access through a reverse proxy.
- Visit
http://your-server-ip-or-domain:configured-port/and log in with theAdminaccount and the password from the config.
In public mode, a player can create an account from the login page. After choosing a password, the page displays
an /ae2webintegration auth <token> command. The player must run that command in game to finish registration.
Networks must have a valid ME Controller, be loaded and finish starting before they appear in the web panel. Controllerless subnetworks are not available through the website.
On all supported versions, a player can gain web access through ownership of an ME Controller, Wireless Access Point or supported terminal connected to the network. Placing your own Wireless Access Point is one straightforward way to set up access.
On GTNH 1.7.10 and AE2 UEL 1.12.2, a working Security Terminal provides another way: add the player's biometric card with all four permissions — Build, Extract, Inject and Craft. Unassigned biometric cards do not grant web access.
The Admin web account can access all available networks without a per-player access grant.
Protect its password accordingly. Choose a network in the web panel to open its terminal.
To show item icons in the web panel, generate an icon pack from your Minecraft client:
- Download the Icon Generator file (
ae2webintegration-icon-generator-*.jar) for your Minecraft version and mod loader from this project's downloads. Place it in your client'smodsfolder. Use the same modpack as the server. - Start the game with the resource packs you want to use for the icons, then enter a world.
- Run
/ae2webicons exportin chat and wait for the progress window to finish. To include animations, use/ae2webicons export animationand confirm the warning; this can take much longer and may produce a much larger pack. Packs containing animations require a server mod version that supports animated icons; version 2.0.0 supports static exports only. - Find the generated
.ae2wi-iconsfile in theae2webiconsfolder inside your game directory. - Stop the server and copy that file into
config/ae2webintegration/. Keep its.ae2wi-iconsextension; the filename can stay unchanged. - Start the server. A fresh browser shows Icons and names automatically when the pack is available. Use Web Settings → Terminal display to change this to Icons only or Names only.
The default theme plays available animations. Turn off Animated resource icons in web settings to use static icons. Your system's reduced-motion preference also disables playback.
The icons use the appearance of your loaded resource packs. You can cancel generation from the
progress window. To replace or remove the server's icon pack, stop the server first and restart it afterward.
Keep only one .ae2wi-icons file in that folder. If several are present, the server logs their names
and disables icons until the conflict is resolved and the server is restarted.
Icons are optional; without an icon pack, the terminal displays item names.
The mod currently includes one built-in theme. More themes are planned.
Choose a theme in Web Settings → Choose a theme. To install one for everyone, place its
ZIP in config/ae2webintegration/themes/ and restart the server. Set general.default_theme in
config/ae2webintegration/config.toml to server:<theme id> to make it the server default, or
builtin:default for the built-in UI. Users can follow that default or keep their own browser choice.
If a theme prevents normal use, open the page with ?safe=1 before its # fragment to
use the built-in UI.
Enable Record crafting history in a network's settings to track its crafting jobs. Enable Include machine-requested crafting there to also track jobs started by machines on that network. The machine option applies to new jobs. Enabling tracking does not reconstruct an ongoing job's history.
Completed and cancelled jobs are saved with the world and remain available after a server restart.
Choose crafting history retention in the network settings. The default is 7 days, with a limit of
1,000 jobs per network. Administrators can change the retention bounds and job limit in crafting_history.
Network settings have independent switches for input/output history and periodic storage quantities. Choose each network's storage sampling interval, input/output interval and history retention there, within the server's allowed ranges. Input/output recording alone does not scan the inventory; accepted input includes resources consumed by void storage. Select a resource in the terminal and open Resource history in its details to view measurements.
Input/output history saves aggregated totals every 60 seconds by default; storage sampling defaults to five minutes. Recent summaries show two minutes of flow and one hour of stock changes. Flow summaries use five-second intervals; stock summaries use the network's configured storage sampling interval. Charts show each measured interval's actual span and retain available partial counts when collection has gaps.
Flow also records the number of accepted input and output operations. Recent summaries show an approximate rate per second when the measured interval is complete. One transfer of 64 items counts as one operation; these counts describe network transfers, not individual machine recipes.
History is stored in an embedded SQLite database at ae2webintegration/grids.sqlite in the world directory.
No database installation is needed. Server startup fails if the database cannot be initialized.
The defaults retain up to 7 days and 250,000 records per network;
the oldest records are removed when either limit is reached. One older stock measurement per resource
may remain as a dated baseline, within the same record limit. Configure minimum, maximum and default
values, plus the record cap, under resource_history in config.toml and apply them with /ae2webintegration reload
or a server restart.
Existing network choices outside new bounds are adjusted to the nearest bound. The record cap can
shorten the selected retention and is not a byte limit. Expired data is hidden from history queries;
physical cleanup runs during database initialization, writes and periodic background maintenance.
Missing measurements are shown as gaps, not zero activity.
With Automatic updates enabled, the terminal and selected CPU view receive live changes over SSE. The CPU list refreshes periodically. Live viewing does not require resource history tracking or increase the frequency of saved storage measurements. After a connection interruption or storage topology change, the terminal loads a fresh snapshot automatically.
Crafting notifications are available only when public mode is disabled.
Crafting completion notifications can be filtered with minimum_crafting_duration_seconds and
minimum_crafting_amount. A notification must meet both configured minimums. Both values default to 0,
which keeps all crafting completion notifications enabled.
Enable Record crafting history for each network that should send crafting notifications.
Crafting updates include the requesting players when identified, using the authenticated account for orders placed through the web terminal. Administrator and localhost access have no player identity.
Create a Discord webhook and set its URL as discord.webhook in the AE2 Web Integration config.
discord.role_id configures an optional role mention.
Crafting notifications include a dark image card with the result, network name, CPU, duration and requesters.
Set discord.crafting_style to IMAGE_CARD (default) for the full card, SMALL_ICON for a text embed with an item thumbnail, or SIMPLE for text only.
Install an icon pack to supply item images. SMALL_ICON sends text only when no usable icon is available; IMAGE_CARD falls back to text if rendering fails.
ntfy sends the same crafting updates as a phone or desktop notification. Set ntfy.host to ntfy.sh or to your own server, and set ntfy.topic to a topic you subscribed to in the app. A host without http:// or https:// is sent over HTTPS.
Leave ntfy.user and ntfy.password empty when the topic is public. A private topic needs both. Setting only one of them turns ntfy off.
notifications.full_domain is optional. When it is set, opening the notification goes to that address.
Administrators and trusted localhost users can edit the active configuration in Server settings.
Save and apply writes config.toml and applies the changes without restarting the web server.
The listener port, administrator password, public mode, password-free localhost access, trusted proxies
and unauthenticated request limit are read-only in the panel; change them directly in the configuration file.
Manual file edits take effect after reloading the configuration or restarting the server.
Set general.allow_server_settings_editing = false in config.toml and reload to disable reading and
editing server settings through the web, including for administrators and trusted localhost users.
The tab then shows a disabled notice instead of the settings. Access is enabled by default; the switch
can only be changed in the file.
Saved Discord webhooks and ntfy passwords are never displayed. Leave their replacement fields unchanged
to keep them, or explicitly replace or clear them.
In public mode, every player can create their own web account and access the AE2 networks they are allowed to use. Registration starts on the website and must be confirmed in game with the command shown by the web panel. The player must be online to register.
Player passwords are stored as salted PBKDF2-HMAC-SHA1 hashes. Sessions expire after one hour without activity and can be extended by use for up to twelve hours from login. Remember me survives server restarts, expires after seven days without activity and can be extended for up to sixty days from login. Watching a live terminal or CPU counts as activity. Changing the password revokes existing sessions. Each account can keep twenty remembered sessions; another remembered login signs out the oldest one.
When public mode is disabled, only the Admin account is available. Its password is configured in the mod's
config file. The session mechanism is the same as in public mode.
Loopback clients are authenticated as admin by default when using localhost, one of its subdomains
(such as www.localhost), or a literal loopback IP address. Localhost names may also have a trailing dot.
This is controlled by allow_no_password_on_localhost. A browser Origin, when present, must match the
request's protocol, host and port; different local names are separate origins.
Behind a reverse proxy, the client address is resolved from trusted forwarding headers as described below.
A proxy or TCP tunnel that presents external clients as loopback can grant them password-free admin access.
If it cannot preserve the original client address, disable allow_no_password_on_localhost before exposing
the panel through it.
The mod has built-in support for resolving the real client IP behind a reverse proxy. The resolved address is used consistently for both the localhost authentication rule and per-IP rate limiting.
The mod only reads X-Forwarded-For or X-Real-IP when the direct TCP connection comes from:
- a proxy running on the same machine as the Minecraft server; or
- an address or network listed in
trusted_proxies.
A proxy on the same machine is trusted automatically and does not need to be added to the config. For a proxy
running on another machine, set trusted_proxies to a comma-separated list of literal IPv4/IPv6 addresses or
CIDR ranges. For example, in the TOML config:
[general]
trusted_proxies = '192.168.1.10, 10.20.0.0/24, 2001:db8::10'
Hostnames are not accepted; use a literal address or CIDR range instead.
X-Forwarded-For takes priority over X-Real-IP. For a chain such as client, proxy1, proxy2, the mod walks
from right to left, skips configured trusted proxies, and uses the first untrusted address as the client. This
prevents a client from granting itself localhost access by sending a forged
X-Forwarded-For: 127.0.0.1 header directly.
For HTTPS termination, preserve the public Host header (including any nonstandard port) and set
X-Forwarded-Proto to the public protocol, http or https. The mod accepts this protocol header only
from the same trusted proxies described above. It is used by implicit localhost access checks and to validate
browser login and registration origins when Sec-Fetch-Site is absent. The proxy must overwrite
X-Forwarded-Proto, not forward an arbitrary client value or append a list. With multiple proxy hops, the
last trusted proxy must supply the verified public protocol.
Example Nginx configuration for a proxy running on the same machine:
location / {
    proxy_pass http://127.0.0.1:2324;
    proxy_set_header Host $http_host;
    proxy_set_header X-Forwarded-Proto $scheme;
    proxy_set_header X-Real-IP $remote_addr;
    proxy_set_header X-Forwarded-For $proxy_add_x_forwarded_for;
}The tools/php-proxy directory contains a PHP reverse proxy that serves
the mod's website, assets and API through an existing web server.
Telemetry is enabled by default outside development environments. The mod sends a small HTTPS usage report ten minutes after server startup and approximately once per hour: a salted fingerprint of the installed mod JAR, Minecraft version, public-mode and singleplayer settings, and a random session ID that changes on server restart and at the first report of each new UTC day. No player identities, world or network contents are reported. See the privacy policy for data handling and retention.
We’d appreciate you keeping it enabled to help guide development.
Disable reporting in Server settings, with enabled = false under [telemetry] in
config/ae2webintegration/config.toml followed by a config reload, or with
/ae2webintegration telemetry off. Use on to re-enable or status to inspect the setting.
The singleplayer owner can use these commands without cheats; on a dedicated server they require permission level 4.
The shared core/ directory contains the HTTP server, web API, authentication, configuration,
crafting and tracking logic, Discord integration and web assets. It is not a standalone Minecraft mod.
The adapter directories provide Minecraft/loader lifecycle hooks, Mixins and AE2 conversions.
| Directory | Target |
|---|---|
core/ |
Shared implementation and frontend |
forge-1.7.10/ |
GTNH |
forge-1.12.2/ |
AE2 UEL |
forge-1.20.1/ |
Forge 1.20.1 |
neoforge-1.21.1/ |
NeoForge 1.21.1 |
Each adapter packages the same local core sources. Shared code must remain independent of Minecraft and loader APIs. A Gradle composite build connects the adapters to one shared core build, while each adapter keeps its own Java compilation toolchain.
Run the root wrapper to build an installable mod for a selected adapter:
./gradlew :forge-1.7.10:buildAdapter builds package core without running its tests. Use ./gradlew :core:build to build and
check core independently, ./gradlew assemble to package all adapters, or ./gradlew build
to build and check all Java modules. A single root invocation shares core tasks across adapters.
Building requires Node.js 22.13+ on the 22.x line or Node.js 24+, with npm on PATH, alongside
Java 25 for the Gradle daemon and the toolchains required by the adapters. Gradle installs locked
frontend dependencies and compiles TypeScript.
Node.js and npm are not required to run the finished mod.
See frontend development for frontend commands and browser tests.
The web API is available under /api/ on your Minecraft server. See the
API documentation; send requests to your own server, not the
documentation host.
- OpenAPI generator — generate the API specification from endpoint annotations and Javadocs.
- Theme author guide — theme contracts, development tools and the example project.
Project code and original interface icons are licensed under LGPL-3.0-or-later. Bundled third-party libraries and assets retain their own licenses:
| Component | Author / source | License |
|---|---|---|
| Project code and original interface icons | kuba6000 | LGPL-3.0-or-later |
| Charts | uPlot, Leon Sorokin | MIT |
| Configuration library (bundled in Minecraft 1.7.10 and 1.12.2 builds) | NightConfig 3.6.4, TheElectronWill and contributors | LGPL-3.0 |
| Interface icons | HackerNoon Pixel Icon Library | MIT |
| Lato font | Łukasz Dziedzic (tyPoland) | SIL Open Font License 1.1 |
| Monocraft font | Idrees Hassan | SIL Open Font License 1.1 |
Screenshots and the interactive demo may display item icons and textures from Minecraft, Applied Energistics 2, GT New Horizons (GTNH), and other third-party mods.
These assets remain the property of their respective rights holders and are subject to their original licenses. They are used to demonstrate AE2 Web Integration's interface and icon support and are not covered by the project's LGPL-3.0-or-later license.
AE2 Web Integration is an unofficial third-party project and is not affiliated with or endorsed by Mojang, Microsoft, the GTNH team, or the respective mod authors.